Migrating to IPv6 on AWS
If you have an existing VPC that supports IPv4 only, and resources in your subnet that are configured to use IPv4 only, you can enable IPv6 support for your VPC and resources. Your VPC can operate in dual-stack mode — your resources can communicate over IPv4, or IPv6, or both. IPv4 and IPv6 communication are independent of each other.
You cannot disable IPv4 support for your VPC and subnets; this is the default IP addressing system for Amazon VPC and Amazon EC2.The following steps to enable your VPC and subnets to use IPv6.
Before you migrate to using IPv6, ensure that you have read the features of IPv6 addressing for Amazon VPC: IPv4 and IPv6 Characteristics and Restrictions.
Step 1: Associate an IPv6 CIDR Block with Your VPC and Subnets
You can associate an IPv6 CIDR block with your VPC, and then associate a /64 CIDR block from that range with each subnet.
To associate an IPv6 CIDR block with a VPC
- Open the Amazon VPC console at https://console.aws.amazon.com/vpc/.
- In the navigation pane, choose Your VPCs.
- Select your VPC, choose Actions, Edit CIDRs.
- Choose Add IPv6 CIDR. After the IPv6 CIDR block has been added, choose Close.
To associate an IPv6 CIDR block with a subnet
- Open the Amazon VPC console at https://console.aws.amazon.com/vpc/.
- In the navigation pane, choose Subnets.
- Select your subnet, choose Subnet Actions, Edit IPv6 CIDRs.
- Choose Add IPv6 CIDR. Specify the hexadecimal pair for the subnet (for example, 00) and confirm the entry by choosing the tick icon.
- Choose Close. Repeat the steps for the other subnets in your VPC.
Step 2: Create and Configure an Egress-Only Internet Gateway
Create an egress-only Internet gateway for your VPC.
To create an egress-only Internet Gateway
- Open the Amazon VPC console at https://console.aws.amazon.com/vpc/.
- In the navigation pane, choose Egress Only Internet Gateways, Create Egress Only Internet Gateway.
- Select the VPC in which to create the egress-only Internet gateway. Choose Create.
Step 3: Update Your Route Tables
For the example above, update the custom route table for the private subnet so that your database instance can use the egress-only Internet gateway for IPv6 traffic. You must also update the custom route table for the public subnet so that your web server can use the Internet gateway for IPv6 traffic.
To update your route tables
- Open the Amazon VPC console at https://console.aws.amazon.com/vpc/.
- In the navigation pane, choose Route Tables and select the route table that’s associated with the private subnet.
- On the Routes tab, choose Edit, specify ::/0 for Destination, select the egress-only Internet gateway ID for Target, and then choose Save.
- Select the route table that’s associated with the public subnet.
- On the Routes tab, choose Edit, specify ::/0 for Destination, select the Internet gateway ID for Target, and then choose Save.
Step 4: Update Your Security Group Rules
For the example above, your web server security group (sg-11aa22bb) allows inbound access from IPv4 addresses over specific ports. You must add rules that allow the same inbound access from IPv6 addresses, namely HTTP and HTTPS access from all IPv6 addresses, and SSH access from a specific IPv6 address (if applicable). You do not need to make any changes to the inbound rules for your database security group; the rule that allows all communication from sg-11aa22bb includes IPv6 communication by default.
To update your security group rules
- Open the Amazon VPC console at https://console.aws.amazon.com/vpc/.
- In the navigation pane, choose Security Groups and select your web server security group.
- In the Inbound Rules tab, choose Edit.
- For each rule, choose Add another rule, and choose Save when you’re done:
- For Type, select HTTP. For Source, enter ::/0.
- For Type, select HTTPS. For Source, enter ::/0.
- For Type, select SSH. For Source, enter the IPv6 address of your local computer or the range of addresses for your local network.
In this scenario, an outbound rule that allows all IPv6 traffic is automatically added your security groups when you associate an IPv6 CIDR block with your VPC. However, if you modified the original outbound rules for your security group, this rule is not automatically added, and you must add equivalent outbound rules for IPv6 traffic. For more information, see Security Groups for Your VPC.
Update Your Network ACL Rules
If you associate an IPv6 CIDR block with your VPC, we automatically add rules to the default network ACL to allow IPv6 traffic, provided you haven’t modified its default rules. If you’ve modified your default network ACL or if you’ve created a custom network ACL with rules to control the flow of traffic to and from your subnet, you must manually add rules for IPv6 traffic. For more information about recommended network ACL rules for a VPC with a private and public subnet, see Recommended Rules for Scenario 2.
Step 5: Change Your Instance Type
- see Instance Types which supports IPv6.
Step 6: Assign IPv6 Addresses to Your Instances
After you’ve verified that your instance type supports IPv6, you can assign an IPv6 address to your instance using the Amazon EC2 console. The IPv6 address is assigned to the primary network interface (eth0) for the instance.
To assign an IPv6 address to your instance
- Open the Amazon EC2 console at https://console.aws.amazon.com/ec2/.
- In the navigation pane, choose Instances.
- Select your instance, and choose Actions, Networking, Manage IP Addresses.
- Under IPv6 Addresses, choose Assign new IP. You can enter a specific IPv6 address from the range of your subnet, or you can leave the default Auto-Assign value to let Amazon choose one for you.
- Choose Yes, Update.
Alternatively, if you launch a replacement instance (for example, if you were unable to resize your instance and you created a new AMI instead), you can assign an IPv6 address during launch.
To assign an IPv6 address to an instance during launch
- Open the Amazon EC2 console at https://console.aws.amazon.com/ec2/.
- Select your AMI and an IPv6-compatible instance type, and choose Next: Configure Instance Details.
- On the Configure Instance Details page, select a VPC for Network and a subnet for Subnet. For Auto-assign IPv6 IP, select Enable.
- Follow the remaining steps in the wizard to launch your instance.
Step 7: Configure IPv6 on Your Instances
RHEL/CentOS
To configure DHCPv6 on RHEL 7 or CentOS 7
- Connect to your instance using the instance’s public IPv4 address.
Using a text editor of your choice, open /etc/sysconfig/network-scripts/ifcfg-eth0 and locate the following line:
 IPV6INIT="no"
 Replace that line with the following:
Replace that line with the following:
IPV6INIT="yes"Add the following two lines, and save your changes:
 DHCPV6C=yes
 NM_CONTROLLED=no
Open /etc/sysconfig/network, add or amend the following line as follows, and save your changes:
NETWORKING_IPV6=yes- Restart networking on your instance by running the following command:
You can use the ifconfig command to verify that the IPv6 address is recognized on the primary network interface.sudo service network restart
To configure DHCPv6 on RHEL 6 or CentOS 6
- Connect to your instance using the instance’s public IPv4 address.
- Follow steps 2 - 4 in the procedure above for configuring RHEL 7/CentOS 7.
If you restart networking and you get an error that an IPv6 address cannot be obtained, open /etc/sysconfig/network-scripts/ifup-eth and locate the following line (by default, it’s line 327):
if /sbin/dhclient "$DHCLIENTARGS"; thenRemove the quotes that surround $DHCLIENTARGS and save your changes. Restart networking on your instance:
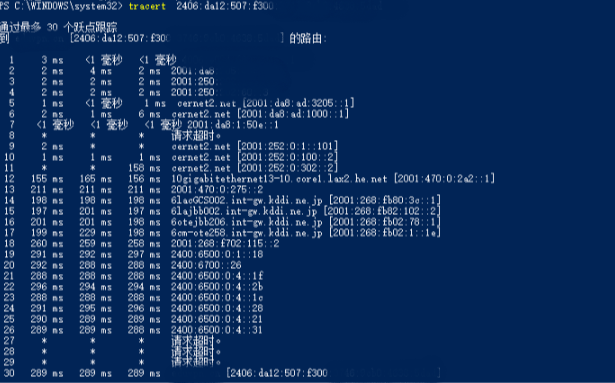
sudo service network restartThe picture shows the routing information from CERNET2 to AWS Seoul.